Showing posts with label sew. Show all posts

Sunday, February 27, 2011

work is not work

 I now "work" VERY part time at the studio/warehouse/office. It sounds funny to call it work because I enjoy every minute of it!
I go down to the studio while the two oldest are in school. And I have an amazing sister-in-law that helps out with the youngest little guy. (All my sister-in-laws are amazing!)
 I have been working on a little something for you all. It was time to start making the Puj Booti in some bigger sizes. It's tough work but someone has to do it.
I just keep pinching myself that I am working in my own studio at my own crazy strong industrial sewing machine.

PS- we just may be doing a little test run this May with the Puj Tub in a store called Target....ever heard of it?   
Ouch!!!! Just pinched myself again : )

Go Puj!

Saturday, February 26, 2011

Where it all began


 These are some shoes I made my niece Celia over 5 years ago.
 Now her little sister Cora wears them.
Isn't she adorable!

Monday, February 7, 2011

potatoe stamp throw pillow

Are you wanting to add a little refresh to your room? I have a little project for you that only takes a couple hours.
 You only need a few supplies
  • fabric
  • pillow stuffing
  • potates
  • acrylic paint & textile medium
 Measure and cut your fabric to be 1.5 inches longer & wider than your pillow (allowing for 3/4' seam allowance)
 Mix two parts paint with one part textile medium (this makes the paint soft and flexible)
Lay your fabric out on a flat surface with paper shopping bags underneath.  Dip potatoes into paint and stamp away. I used three different sizes of potato.
 You can even section off the area you want to stamp with masking tape.
 Dry the paint with a blow dryer until it is completely dry.
 For a quick and easy solution use an overlapping flap on the back (overlap the fabric about 4"). You can even use glue-tape for the flap seams instead of sewing them (it has a more minimal look)
 sew your edges and.....

you're finished! Wasn't that so easy. 

Now you'll be wandering around your house to see what rooms could use a refresh with some fun throw pillows.

Monday, January 17, 2011

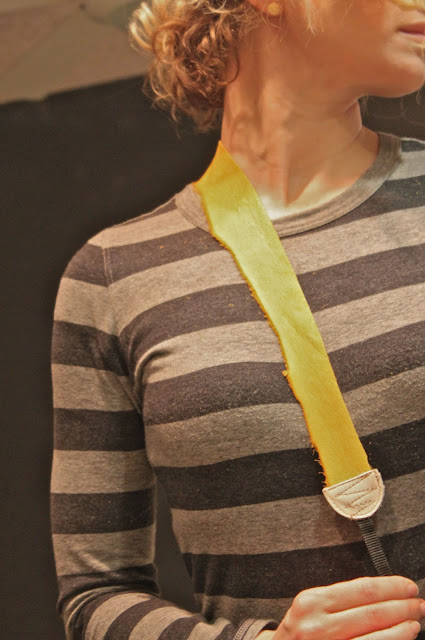
camera strap

I have always wanted to make my own camera strap and today it finally happened!
I decided to use leather since it's durable and non-slip.
First I cut out the new strap. Notice I used the natural edge of the leather on one side.
I also cut out 4 small half circles to attach the webbing to the strap.

Then I cut off the black webbing from the old camera strap and attached it to the leather.
(be sure to use a LONG stitch when using leather. It looks better and is more secure)
And to secure it all together I did a fun zig-zag stitch.

Try it! It only took about 30 minutes and now I am not advertising for Canon everywhere I go (don't worry Canon, we're still friends).

Tuesday, November 30, 2010

sewing

 I have been getting in the mood to organize things in my home.

I am loving this simple thread organization. (sorry, don't remember where I found this image)
And with an organized sewing station I think I will sew some one-of-a-kind holiday decor. Don't you think this fabric mobile would look great in just the right Christmas colors! (seen on Shim + Sons)

Tuesday, November 16, 2010

jump

I like to jump.
There is something about the weightlessness and the freedom that causes me to propel myself into the air and hope for a good landing.

Growing up I was a gymnast and a diver who was always bouncing off of something.
In college it was snowboarding, wake-boarding, and rock climbing.

Now I am a mom and I am mostly just looking to giggle like a little girl.

Below are some pictures of our jumpy weekend on the Oregon coast with good friends...enjoy!


I hope in some way that these pictures have inspired you to be weightless and free. But most of all I hope you go do something that makes you giggle.

Saturday, November 6, 2010

Rome

When I was in Rome 9 years ago I bought a classic A-line olive green skirt.
This week as I cleaned out my closet I decided this skirt could use a refresh!

 So I cut it into thirds, threw away the bottom piece, and sewed back on the middle piece. I thought the seam line would be a nice detail. 20 minutes and I had myself a new skirt that would look perfect with some colorful tights and brown boots.
 But before I went wearing it around town I decided to add a little detail to the front and back. It's these little details that take it from looking like you bought it at Target to something you found at a High-End Boutique!
(I also sewed the same detail on the back side)
This is the finished product.
As a side note, when I wore this skirt to the grocery store a woman stopped me and asked where I had gotten my skirt. When I told her how I made it she high-fived me! (she made my day)

I find refashioning to be more interesting than High End Boutiques anyways.

So go through your closet and give that skirt you don't wear anymore a refresh. But be warned, you may be stopped when you wear it to the grocery store.

Monday, November 1, 2010

"get candy get candy"

(Superheros eat 10 grain cereal for breakfast!)
 Mr. T was needing a Halloween costume this year. So, being the smart buyer that I am, I went to Goodwill and got a fun green super hero costume for $3.99. What superhero you might ask? Well, I am not exactly sure, but I think it was a Power Ranger costume. I just picked one that was colorful, cheap, and had potential.
Now, all I had to do was make a fun Super Headpiece and we were in business.
(He added the black mask to the costume all on his own. It was a great way to add mystery to the costume)
So, using some materials I already had on hand we whipped up a fun Superhero hat. I got my inspiration from here (thanks Kelli). 

He loved the Superhero costume and has been making superhero sound-effects ever since.

Hooray for cheap and fun costumes!

Thursday, June 17, 2010

pant skirt : danielle style

This is my friend Danielle
We met at my favorite grocery store, WinCo.
She is the female version of my husband
{I think that's why we get along so well}

She came over the other day to do some
pant to skirt conversions with her girl's holy pants.

We decided to do some interesting seam lines
in the triangle panels......what do you think?
I think it's just the right amount of funk for her
super fun girls!
Send me your pants to skirt pictures, I want to see them!
See my other transformations here, here, and here.
And check out my sister Nancy, she has been going to town....
Go Nancy!
Posted by Picasa

Wednesday, March 17, 2010

Holy Jeans

It doesn't matter what brand of jeans I get my boys, without fail they will have put a hole in the knees within weeks of wearing them. Okay maybe not WEEKS, but pretty close. And if you're saying outloud right now, "My kids do the same thing!" then you're going to love this post.


 So what do we do with a perfectly good pair of jeans that are holy?

Patch them up of course!

This is the way I have found to be the fastest, easiest, cutest way to patch jeans and you don't even have to use a straight pin....yeah!

  1. Cut a patch out of some old jeans that are in your Goodwill pile. (I use an old pair of my husbands) Make sure the patch is wider and taller than the hole by about 2.5" - 3" on the top and bottom
2. Turn the holy jeans inside-out. We will be patching the underside of the jeans, not on the outside where it's visible. Line the outside of the patch with iron-on tape. (You can get this at most craft stores.) Put the tape in between the patch and the jeans and then using a very hot iron, "glue" the patch to the jeans.
 

3. Now slide the pant leg onto your sewing machine and get it oriented any way you can. Just make sure you are only sewing through one side of the jeans and not two. Then begin sewing down the patch in a zig zag pattern. Make sure you sew past the hole so it's nice and secure.
 
4. There...you're done! Wasn't that easy. Now stand back and admire your work because you just saved yourself $20+ and a trip to the store. Plus the end result is kind of cute don't you think?
 What items need repairing around your house?